Tuesday, August 30, 2011
August Card Class
Today was Card Class day at my house and six of us met to have some fun, craft awhile, celebrate a birthday and eat goodies! Lol! We made a Flower Pot note card to send to people who needed cheering up :) or just would appreciate a special little message hidden in a card. It was a lot of fun seeing how these turned out differently as each person treated the flowers a little differently and each of us had slightly different pieces of designer series paper, all from the new Stampin' Up! Flirtatious paper pack. We made the flowers using the Blossom Party Big Shot dies and we even made our own buttons so they would match in with the flowers.
I love holding Card Classes with my crafty friends :)
Thursday, August 18, 2011
Birthday Flowers
There are sooo many new stamp sets I have on my Wish List from the new Stampin' Up! Idea Book and Catalogue, but Printed Petals is still fun to play with :) And it's continuing to be available in the new catty too! I decided to go with it to make a pretty birthday card.
I used thumping (with Rich Razzleberry, Daffodil Deligt and Melon Mambo) and spritzing with Frost White shimmer paint diluted in isopropyl alcohol to make the stamped images for the flowers on Whisper White cardstock, stamping two images with the same thump-inked stamp. Didn't they turn out pretty?
Then I punched out some flower centres from Rich Razzleberry and Melon Mambo cardstock and popped them up with Stampin' Dimensionals before finishing off with a Rhinestone.
I made the leaves with some folded Old Olive cardstock and my crimper, free cutting the leaf shapes out after crimping them.
The background is stamped with a Baroque Motif flourish in Soft Suede, and the sentiment is from the Bring on the Cake stamp set stamped on Very Vanilla cardstock and punched out using the Word Window punch.
I hope you enjoy seeing the card :)
Sunday, August 14, 2011
'Instant Date' Birthday Box Card
What do you get a friend who has everything except time to go out with his wife? Why, a date in a box, of course!
I was playing with some of the new goodies I got in my advance order from the new Stampin' Up! Ideas Book and Catalogue when I thought of this idea. My own husband had just taken me to the movies and I remembered how much we treasure those times alone together. While we were buying our own tickets, I bought some for our friends. Then after the movie I found a double block of fruit and nut chocolate to go with the tickets. I couldn't just hand him a plastic bag with these goodies inside, could I? So of course I made a box to house them :)
I used the new Pennant Parade punch and the Timeless Type Junior Alphabet Sizzlets for the name, based my box on Night of Navy and Old Olive cardstock and designer series paper (using photo corner punch to add details to the corners) and big silver brads with some linen cord to hang the pennants which I popped up with Stampin' Dimensionals. The sentiment is from a retired stamp set whose name I can't recall right now...
And when we gave it to him, Clive loved the chocolate and now he and his wife are looking forward to a break :)
Enjoy, you two!
For more project ideas return to PaperCraftCentral.com
Monday, August 01, 2011
Retirement List!
It's time for us to say goodbye to some of the products at Stampin' Up! There's a Last Chance Retirement List out that will be updated regularly as products sell out and then after August 31st they will be gone forever. A new catalogue will be available from 1st September.
Do contact me if you live in Australia and would like any of the retiring products or a new Idea Book and Catalogue :)
Saturday, July 30, 2011
Thumping Great Butterflies!
I love these colours together. Blushing Bride, Crumb Cake and Whisper White cardstock were made for each other. And the beautiful Organza ribbon has become a favourite of mine. It is so soft and easy to tie into a pretty bow.
The Strength and Hope stamp set really lends itself to making delicate, pretty cards. I wanted to see if I could make the butterflies have a little more depth and character though, so for this card I used the thumping technique. I chose a couple of colours of Stampin' Write markers and, starting with the lightest colour, used the side of the thicker point on the stamp. I bounced it around the stamp on the areas I wanted to highlight. Then I used the next colour, thumping it to fill in some more spaces, and so on till I had covered the stamp.
It took me awhile to add all the colours and some of the ink looked a little dry, so I 'huffed' (breathed warm air) on it to rehydrate the colours before stamping.
So there you have it - Thumping Great Butterflies! Lol!
Tuesday, July 26, 2011
July Card Class
We had a great card class today :) Thank you fro coming, ladies! I enjoyed our chats, the food (the Food! So much!) and of course sharing in your crafting :)
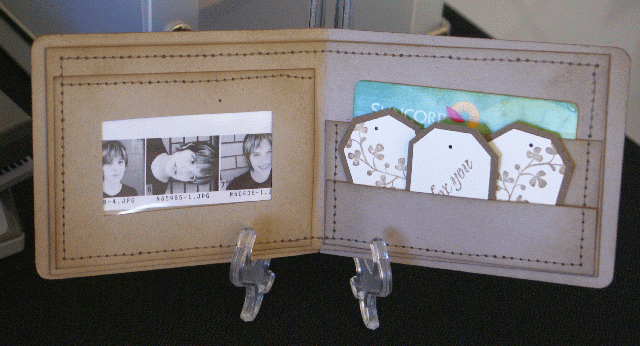
We made two projects today. I found a paper wallet online and made one up for the ladies to try, then found a lovely thank you card that I CASED from Wendy Hawkinson's blog (thank you for sharing, Wendy). I'll post some examples for you to see :)
PS: If you live in my vicinity, do remember I hold monthly card classes now. See SusanSalutations for details and to book in!
We made two projects today. I found a paper wallet online and made one up for the ladies to try, then found a lovely thank you card that I CASED from Wendy Hawkinson's blog (thank you for sharing, Wendy). I'll post some examples for you to see :)
PS: If you live in my vicinity, do remember I hold monthly card classes now. See SusanSalutations for details and to book in!
Monday, July 25, 2011
Watercolour Stamping
Have you tried watercolour stamping? Here I used some watercolour paper and Stampin' Up!'s Fifth Avenue Floral stamp set. After colouring the images with some Stampin' Write markers, I spritzed the images lightly with ordinary water before stamping as normal. The effect was lovely and soft compared to the usual crisp, clean images obtained without water.
There are a few more water colouring tips on PaperCraftCentral.com if you would like to explore a few more options :)
The other cardstock and ink are So Saffron, Bravo Burgundy and Garden Green. The ribbon is Night of Navy and the sentiment is from the Create a Cupcake stamp set also from Stampin' Up! The ferns in the background stamped in Versamark are from a retired Stampin' Up! stamp set called Organic Grace.
Sunday, July 17, 2011
Children's Birthday Cards
If you have been wondering what we get up to at Card Classes, here is a sample of the parade of creatures we made last week! I showed my ladies how to make childrens birthday cards using their Scallop Circle Die and #2 Circle die with the Big Shot, and a few punches. What a fun day it was!
These little cards are just perfect fro a young child's party. They do not take long to make so you won't mind quite so much if they get ripped or crumpled, and the children do love them.
Actually we adults had a lot of fun reliving old memories of childhood and child rearing ourselves. The Muppets have been around for a long time! Lol!
If you would like to see how to make your own fun children's birthday cards, there is a tutorial on PaperCraftCentral.com for you.
Congratulations Cards
Here's a card with a little different style to the last one I posted :) While I personally love Vintage cards, sometimes I need a simple one for a man, and vintage style doesn't really make me think of masculine cards. I like to have a couple of congratulations cards on hand so I can be prepared for times when some recognition is in order!
I made this one using a stamp from Stampin' Up!'s Fun and Fast Notes. I don't know if this stamp set will be available in the next Idea Book and Catalogue coming out in September but I have liked this set from the start. The images make whipping up a quick card just so easy.
If you want more details for how I made this card, I wrote a tutorial about it on PaperCraftCentral.com for you.
Wednesday, July 13, 2011
Tiny White Flowers
Isn't this a pretty card? It was inspired by one made by Monica Gale and I just love it. I used the birdcage from the Nature Walk stamp set from Stampin' Up! plus the Vintage Wallpaper embossing folder from the same source. The papers are Whisper White, Basic Black, Sahara Sand and Very Vanilla. I thought it was just such an elegant card I decided to teach a few friends to make some too at a card class today. Here they are:
I really think these little cards are beautiful! Well done, ladies :)
Do you like the little white flowers on the cards we made? If you have not tried making these flowers, of course there is a tutorial for you over at PaperCraftCentral.com. Enjoy!
Sunday, July 10, 2011
Retreat!
Just thought I would share another cupcake card from the Brisbane Papercraft Expo stall we ran :) I like how cheery it is, being made of So Saffron cardstock and scrunched Old Olive ribbon and all. And it says 'Celebrate', which is what I just got finished doing at the Stampin' Up! Retreat held for our Independent Demonstrator team this weekend.
We stamped! We inked! We punched! We ate! We talked! We laughed! I think there were about 30 of us who stayed for the three days of the Retreat (I elected to leave half a day early to go to church) but we had a great old time while together.
In case you want to get away for a crafty break too sometime, I advertise when they will happen on SusanSalutations. I'll upload the dates for the next ones shortly. If you are within reasonable distance of Brisbane, Qld Australia, and you want to come along to a Retreat, let me know!
Sunday, July 03, 2011
Motorbikes Forever!
I'll tell you a little secret. In my youth I rode a small motorbike. I had friends who had bikes and we would go for long rides, feeling free and exhilarated in the open air! So when I saw the new Motorcycle stamp in the 2011 Autumn-Winter Mini catalogue from Stampin' Up!, well, I just had to get it.
It is quite a lovely detailed stamp and when I saw it, I immediately thought of using the faux metal technique. I think I need a few more practice goes but in the end I was pretty happy with how the image turned out. I made it into a birthday card to have on hand when the next man in the family has a special day :) None of the other family women ever learned to ride a bike that I know of! Lol!
If you would like to see how to make a faux metal image, the instructions are on PaperCarftCentral for you now.
Saturday, July 02, 2011
Embossing Makes Cards Pop!
The Big Shot is such a versatile machine! I love how it embosses and what you can do with the beautifully embossed cardstock. I made a series of cards with my Build a Cupcake punch and used the coordinating Create a Cupcake stamp set (both from the Stampin' Up! Autumn-Winter mini catalogue) but wanted to add a richness to the cards that only embossing and pretty ribbon can bring.
We used these cards at the Brisbane Papercraft Expo of course :) You can see the entire series at www.PaperCraftCentral.com, of course!
Friday, July 01, 2011
Scrapping an old photo
Have you ever got cold feet about an old photo and whether or not to scrap it? I have had this picture for a very long time and finally got the courage to do something with it. I was glad I did! Now it will be protected for years to come instead of floating around on my craft desk making me feel guilty :) Lol!
If you would like a little fuller explanation about how I made some of the elements in this retro layout, here's the link on PaperCraftCentral.com
Thursday, June 30, 2011
Black Magic Inking Technique
Here's a way to make a dramatic impact with a stamped image, some light coloured ink on dark cardstock, and some chalks. I made this card for the display at the Brisbane Papercraft Expo
Wednesday, June 29, 2011
Buckle Card
The fan fold flower card shown below is actually a buckle card. I have had people asking how these cards can be made and to help you, I have made a tutorial about these cards that is now available on PaperCraftCentral.com
If you have been making these cards for a long time, I would love to see your version of them. Blogger does not allow you to upload pictures in the comments section, so if you would like to upload a photo of your own work you can do so at PaperCraftCentral.com. I would love to see more cards made with this design!
Monday, June 27, 2011
Flowers from the Fan Fold
Have you ever made a fan fold flower? I found out how to make these and decided to create a buckle card with this type of flower embellishing it for a special birthday coming up. I made a tutorial about how I made them at PaperCraftCentral.com, of course! Just for you!
Hope you like it :)
Cute Puppy
I made a double layout of my cute little puppy while I was at a Scrapchat retreat last month. The pictures were just begging too be scrapped and when we were given a wonderful four photo sketch to work with, I was away!
Teddy has grown quite a bit since these pictures were taken. I'll have to update you with some newer ones soon. He's still as cute as a button :)
More about how this layout was made at PaperCraftCentral.com
Wednesday, June 08, 2011
An Album for Ali
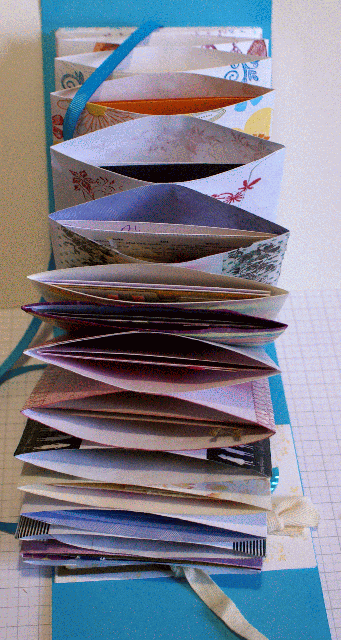
I made a special album to hold a lot of cards handmade for a certain friend who has been feeling low lately. A bunch of us girls got together secretly and decided to do something to cheer her up. Each of us made a card and I collected them all to make into this little album. It contains over a dozen handmade cards and decorated envelopes from a dozen different friends! We gave it to our friend this week and yes, there were tears!
Here's the album opened up,
a pic with the cards released from their ribbon,
and a shot of the back of the album too.
If you would like to know how to make a similar album, the instructions are on PaperCraftCentral for you.
I'd love to see your version if you make one, so please do leave a link in the comments section if you do :)
Monday, May 23, 2011
Inking Techniques
I discovered a new inking technique that involves using my brayer and a couple of ink colours recently and had to have a play. I also found a way to make leaves using my paper crimper and wanted to share them with you :) If you would like more details, go to PaperCraftCentral.com to see how it was all done!
Subscribe to:
Posts (Atom)