Do you have the Stampin' Up! Top Note Big Shot die? I found a use for the doubled-over shape in making quick and cute placecards. I needed to make about 70 placecards for my daughter's black, silver and red wedding and the theme was ladybugs, so I found a ladybug die too and cut them out to add to the plain white card. I wrote the guest's name with a silver and black ink pen.
Here's the Top Note die shape:
And here is a picture of some of the placecards in action:
You could of course customise these to be any colour and as fancy as you want!
Till next tim/.
Friday, May 25, 2012
Tuesday, May 22, 2012
She Art
I had fun learning something new this weekend. I tried a mixed media approach with a canvas, some paint, inks, stamps, glue, old scrapbook papers, masks made from salvaged materials, old dress patterns, Stampin' Write markers, and bling. Thank you Chelle Jamieson of Chelle Bean Designs for generously giving your time to teach a group of us about this technique! It was a lot of fun and I actually liked everyone's work very much. Here's my attempt for you to see what you think:
Monday, May 14, 2012
Feeling Owl-ish?
This was my May 1st Class card and I so enjoyed making a sparkly background for this little night-owl, that I have issued an Owl-ish challenge at PaperCraftCentral this month. Do you know some cool ways to make a night scene for an owl to adorn? I used my Owl Builder punch from Stampin' Up! to make my own night bird, and sat him on a branch cut with the Bird Punch. It's fun to make these little guys.
I hope you share your own night owl card with me this month :)
PS: Card CASED from Adele Suda. Thanks, Adele!
Saturday, May 05, 2012
Card in a Sleeve
Here's a pretty way to wrap up your message. Make a sleeve for it! Punch two holes on the right end and thread it with ribbon long enough to allow your inner card to slide into the sleeve, ending with the bow on the sleeve. I added extra ribbon under the flower and attached it to the left side of the sleeve to make it look like the ribbon is part of the mechanism for sliding the inner tag in and out. He he.
The flower is made with the Build-a-Blossom stamp set and Blossom Builder punch from Stampin' Up! The designer series paper and the ribbon is from the Everyday Enchantment pack and accessories that were available during this years' Sale-A-Bration. I added a flower brad to the middle of the main blossom. Inks are Cajun Craze, Old Olive and Baja Breeze, and I used a few other Stampin' Up! punches here and there :)
Saturday, April 21, 2012
Kraft Resist
I know I have some retired Stampin' Up! embossed resist paper, but do you think I could find it? Noooo. Just as well my friend Alz sent me some to play with. I wanted to try colouring it then stamping on it. I used sponges to get the coloured background, then, as the Kraft Resist paper was French, I stamped in archival ink on top with the Stampin' Up! Artistic Etchings stamp set. I really liked the depth that created and the way the stamped images seem to float on air....
PS: You could make your own Crumb Cake resist by clear embossing on it. Must try that another day :)
PPS: If you are reading this, Alz, thank you again for being such a generous friend! I will get to use the titles and embellishments you cut for me out of Pacific Point soon, I am sure - they are just begging to be put on a page!! xx
PS: You could make your own Crumb Cake resist by clear embossing on it. Must try that another day :)
PPS: If you are reading this, Alz, thank you again for being such a generous friend! I will get to use the titles and embellishments you cut for me out of Pacific Point soon, I am sure - they are just begging to be put on a page!! xx
Friday, April 20, 2012
Tea Shoppe Cards
I'm in a couple of swaps at the moment and I found a cute idea to make for it with the new Tea Shoppe stamp set from Stampin' Up!
I used the masking technique to stack the cups on the front of the cards and the new Twitterpated designer series paper is a dream to work with. The main colours used are Poppy Parade, Baja Breeze, Island Indigo and Pear Pizzazz.
Inside i made a little folded pocket and decorated it with another stamped image from the Tea Shoppe set as well as some punched borders and shapes.
I chose tea bags to sort of blend with the colours of cardstock and embellishments I used so they also became embellishments (did you know you can get heaps of beautifully packaged tea bags from the supermarket? The colour choice is amazing!)
I hope people like the swaps they are getting. Here is one version of them:
...and here is another version, using the same colours, stamp set and papers:
So what do you think? Do you have some new goodies from the Autumn/Winter mini catalogue? If so, what have you made?
PS: Remember, Aussie readers, that I can organise an order for you if you would like a catalogue to some of the new stamp sets and products available in the new Autumn/Winter mini catalogue
I used the masking technique to stack the cups on the front of the cards and the new Twitterpated designer series paper is a dream to work with. The main colours used are Poppy Parade, Baja Breeze, Island Indigo and Pear Pizzazz.
Inside i made a little folded pocket and decorated it with another stamped image from the Tea Shoppe set as well as some punched borders and shapes.
I chose tea bags to sort of blend with the colours of cardstock and embellishments I used so they also became embellishments (did you know you can get heaps of beautifully packaged tea bags from the supermarket? The colour choice is amazing!)
I hope people like the swaps they are getting. Here is one version of them:
...and here is another version, using the same colours, stamp set and papers:
So what do you think? Do you have some new goodies from the Autumn/Winter mini catalogue? If so, what have you made?
PS: Remember, Aussie readers, that I can organise an order for you if you would like a catalogue to some of the new stamp sets and products available in the new Autumn/Winter mini catalogue
Tuesday, April 17, 2012
Water Colour experiments
Do you like using Stampin' Up! watercolour paper? I was playing with markers and blending pens today to see what effects I could get with it. It's amazing how different the results can be depending on what you do with water! The water colour paper can take lots of water, unlike other kinds of cardstock. I like how thick watercolour paper is too, and its texture.
Now I'm curious. What do you like about watercolour paper?
Monday, April 16, 2012
Triple Treat Birthday
It was a special friend's birthday this week and I made her a card, of course! I know she likes easel cards so I tried to put together something a bit more 3d than my 'usual' cardmaking style usually allows. I cut two parallel lines in the front of the card and pushed that section out so it formed a raised platform, Then I folded some steps int he card front to allow it to stand alone. This also meant i had several layers to put my embellishments on, so embellishing i did go.
The Triple Treat Flower and Teeny Tiny Sentiments stamp sets came in handy again as did some of my punches. I chose shades of purple and pink (Wisteria Wonder, Concord Crush, Pink Pirouette, Blushing Bride and Rich Razzleberry) to bring everything together. There are rhinestones in the middle of each flower's centre and the centres are popped up with Stampin' Dimensionals. Oh and I used some of that new pleated ribbon that Stampin' Up! has for sale in the Autumn-Winter mini catalogue. I really like that ribbon. It is shown here in Blushing Bride shade, but you can get it in Pear Pizzazz, Baja Breeze and Riding Hood Red as well. I added a small touch of white organza ribbon to finish off the look.
If you want some ribbon, stamps, ink or paper, remember I am a Stampin' Up! Demonstrator so can order some in for you if you live anywhere in Australia.
The Triple Treat Flower and Teeny Tiny Sentiments stamp sets came in handy again as did some of my punches. I chose shades of purple and pink (Wisteria Wonder, Concord Crush, Pink Pirouette, Blushing Bride and Rich Razzleberry) to bring everything together. There are rhinestones in the middle of each flower's centre and the centres are popped up with Stampin' Dimensionals. Oh and I used some of that new pleated ribbon that Stampin' Up! has for sale in the Autumn-Winter mini catalogue. I really like that ribbon. It is shown here in Blushing Bride shade, but you can get it in Pear Pizzazz, Baja Breeze and Riding Hood Red as well. I added a small touch of white organza ribbon to finish off the look.
If you want some ribbon, stamps, ink or paper, remember I am a Stampin' Up! Demonstrator so can order some in for you if you live anywhere in Australia.
Sunday, April 08, 2012
Playing...
I was playing with some retired Stampin' Up! sets, and also with some watercolour paper and Stampin' Up! marking pens and other inks, including an archival one. I wanted to see if I could get a vinatge-y watercolour-ey effect. I thought I liked the first try alright but wasn't sure if it was finished:
I kinda liked the background (done with a blending pen and spraying water on the watercolour paper before and after and during colouring with the blender pen, whatever seemed right at the time - lol!). But there was still too much open space for my liking. It didn't really hang together, or something.
So I got out a script stamp from the recent summer mini catalogue (it's in the Open Sea stamp set) and stamped right on over the whole thing a couple of times with archival ink.
Yeahhhh. I liked that better. :)
I kinda liked the background (done with a blending pen and spraying water on the watercolour paper before and after and during colouring with the blender pen, whatever seemed right at the time - lol!). But there was still too much open space for my liking. It didn't really hang together, or something.
So I got out a script stamp from the recent summer mini catalogue (it's in the Open Sea stamp set) and stamped right on over the whole thing a couple of times with archival ink.
Yeahhhh. I liked that better. :)
Saturday, April 07, 2012
2012 Creative Challenge at PaperCraftCentral
There's a challenge set just for fun over at PaperCraftCentral. It has something to do with this card.
Why not go on over and see what it's all about? I would love to see your entries rolling in :)
Friday, April 06, 2012
Easter Box
We made these cute little boxes with two of the Milk Carton dies from Stampin' Up! Cut two and remove one panel (the one without the tab) and adhere them together. You can have an 'iny' or 'outy' closure depending on how you pinch the folds together.
You can then decorate your box in any way you want. I made a punch art bunny and carrots from the Build a Blossom stamp and punch set.
Happy Easter everyone. Remember it is much more about our Lord than about chocolate eggs and bunnies :)
You can then decorate your box in any way you want. I made a punch art bunny and carrots from the Build a Blossom stamp and punch set.
Happy Easter everyone. Remember it is much more about our Lord than about chocolate eggs and bunnies :)
Wednesday, April 04, 2012
Triple Treat Flower Stamp
Don't you just love how so many of Stampin' Up!'s products are versatile and clever? Take the Triple Trat stamp, for instance. You can stamp it out in a plain colour and use it flat, or you can punch out the middle flower and the centre of it too and make them different colours, pop them up to create a three dimensional look, or use them individually. You can substitute other shapes int he punched holes too. I was playing with my Triple Treat stamp the other day and came up with this flower for my March Stamp Club tiny thank you cards :
I liked how the contrasting layers looked. I used Tangerine Tango, Pacific Point and So Saffron cardstock and stamped them in Basic Black ink. As the flower was for the inside of my little card, I did not pop the layers up on Stampin' Dimensionals, but it would have been easy to do.
Today I made a card for a friend and used one of the flowers on it, combining the stamped image from Easy Events to make my flower stem and scene:
I heat embossed the stem, sentiment and grass in black before using my Stampin' Write Old Olive marker to add colour to the grass. I also sponged Baja Breeze ink over a Scallop Circle shape to make the clouds, then sponged a bit of Tangerine Tango over that to add a bit more interest. See how i used the Triple Treat stamp as a card background too? I filled in the small spaces between the large stamp with small flowers from the Fresh Vintage stamp set. Then I punched a heart edged border from Pacific Point, layered on a strip of So Saffron, dyed some Bakers Twine in Tangerine Tango ink, punched out a tag and heart to tie it on with the twine, and finished with a few dots along the So Saffron strip in black journaling pen. There's a clear circle button in the middle of my Triple Treat flower.
I hope you enjoyed a glimpse at my Triple Treat flower cards.
PS: If you Aussie readers would like to order a Triple Treat Flower stamp (125040) for $16.95 plus $5.95 postage, or if you would like to order any other current Stampin' Up! products, contact me on SusanSalutations. There's a pink 'contact me' button at the top right hand corner of the page.
I liked how the contrasting layers looked. I used Tangerine Tango, Pacific Point and So Saffron cardstock and stamped them in Basic Black ink. As the flower was for the inside of my little card, I did not pop the layers up on Stampin' Dimensionals, but it would have been easy to do.
Today I made a card for a friend and used one of the flowers on it, combining the stamped image from Easy Events to make my flower stem and scene:
I hope you enjoyed a glimpse at my Triple Treat flower cards.
PS: If you Aussie readers would like to order a Triple Treat Flower stamp (125040) for $16.95 plus $5.95 postage, or if you would like to order any other current Stampin' Up! products, contact me on SusanSalutations. There's a pink 'contact me' button at the top right hand corner of the page.
Monday, March 19, 2012
I've been making paper and fabric flowers, playing with more punches and dies. I placed four blooms on stamped Very Vanilla in turn mounted on Whisper White. Then I put my name on the back and packaged these in clear cellophane bags for a swap. I made nine cards of four flowers each, which means I made 36 flowers. I hope people like them.
A Mother's Day box made with Box No 2 die and some Sizzlets and punches, all from Stampin' Up! Too bad the simply Adorned jewelry isn't going to be continued here past March 31st. It was fun making pretty little works of stamping to put in the necklace and bracelet, and my jewelry will keep I am sure. Oh well! There's plenty more to play with after all!
Tuesday, February 21, 2012
All Year Long Christmas Card Challenge
I've been enjoying a challenge made by Alz to gradually make as many cards that I need for Christmas throughout the year, It is going to be great if I can keep it up. I am making a dozen a month. This way I should be able to send a handmade card to each and every person on my list. That is something I have NEVER achieved before! I hope it happens. Knowing me, things do get in the way of good intentions, especially when it comes to card making...
Thank you, Alz, for making this challenge and I am already grateful fro the two dozen cards I have stored away :)
Here's a peek at some of the cards I made last week and today with a green and silver theme:
Thank you, Alz, for making this challenge and I am already grateful fro the two dozen cards I have stored away :)
Here's a peek at some of the cards I made last week and today with a green and silver theme:
Tuesday, February 14, 2012
Fun Banner Cards
It was fun to make these little 'thank you' cards for my Stamp Club ladies tonight.
I used a scallop circle as a template to make the clouds. Aren't they pretty?
I got the idea from a fellow stamper, Jane Blakeley. I'll list all the items I used so you can have a play too. The clouds are fun to make :)
I used a scallop circle as a template to make the clouds. Aren't they pretty?
I got the idea from a fellow stamper, Jane Blakeley. I'll list all the items I used so you can have a play too. The clouds are fun to make :)
Supply List: (mostly from Sale-A-Bration)
Whisper
White and either Pool Party, Lucky Limeade or Tangerine Tango cardstock base
Everyday
Enchantment designer series paper & ribbon
Fresh
Vintage and Outlined Occasions stamp sets
Chocolate
Chip, Bashful Blue, Tangerine Tango inks
Scallop
Circle punch (to make template for clouds), ½” circle and Petite Pennants
Punches
Tuesday, January 31, 2012
Tiny Paper Daisies
I just could not resist quilling some more little paper daisies tonight. I m planning to use them to make Mother's Day Cards for the Troops. It will be nice to have a little stash of them like this when I am making my cards with the church ladies. I think they will go well with the little hearts we are also planning to make. Hearts and flowers for Mother's Day. It seems so right!
Sunday, January 29, 2012
Shutter Fold Card
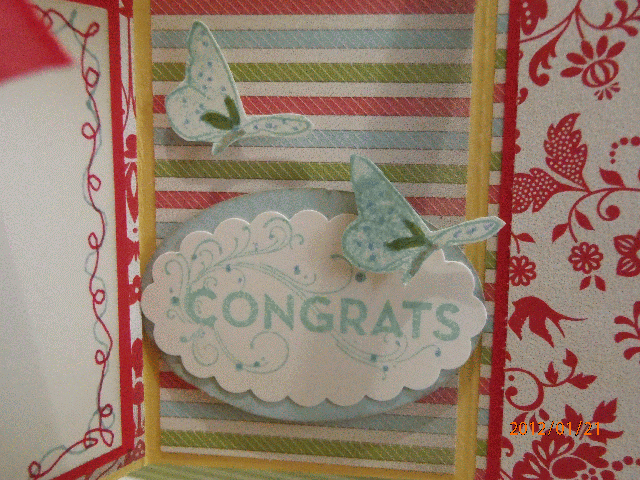
Special friends celebrated their 10th anniversary this month and I wanted to make them a memorable card. This one seemed to hit the spot! It's a Shutter Fold card and there are many examples of how to make this on the Internet. Maybe I'll put a tutorial up on PaperCraftCentral anyway one day. It isn't a hard card to make in spite of how it may look to someone who hasn't made one before.
The supplies are all from Stampin' Up!
So Saffron card base
Everyday Enchantment Designer Series Paper
Poppy Parade cardstock
Real Red ribbon
Stampin' Write markers in Poppy Parade and Bashful Blue
Every Moment Stamp Set
Poppy Parade and Bashful Blue ink
Scallop Oval, Oval and heart shaped paper shapers
Non-SU! letter stickers
PS: There is a tutorial for the Quilled Daisy on PaperCraftCentral.com
Saturday, January 21, 2012
Happy New Year! I really hope you are all having a good start to 2012. I had a wonderful time on a cruise ship and spent my New Year there. If you haven't been on a cruise, it was a lot of fun. Did you know they even have craft classes on cruises?? Ours was taken by the Entertainment crew, who also doubled as singers, dancers, musicians and actors other times. Talk about laugh! I focused on learning some more about quilling but we had the chance to learn some basic beading too. I plan to use my quilling skills a bit more often now. Next time I go on a cruise I will take my own paper scissors and glue, but really they did supply all the necessary items to do quilling. I just prefer my own scissors and glue! Lol! And then I could have kept going with projects in my cabin once the lessons were over, though I may not have as there was so much else to do and experience on the cruise.
The port hole in our cabin was a constant source of delight. It showed us when we were coming into ports, what the weather was like, the stars by night, oh it was lovely being able to just hop out of bed at night and watch the ocean rolling by. It was also a convenient platform for taking pictures of my quilled pieces!!
See how there is a good sized ledge available? I laid my crafty pieces out on this ledge and relied on the light from the sky and sea to illuminate them. How romantic! Sigh!
Here's a double frilled flower I learned how to make. I must make a tutorial for you on PaperCraftCentral.com one day soon. They are easy to make with scraps of scrapbooking paper or thin cardstock.
These quilled roses and leaves were easy to make as well. I placed them on the very end of a bookmark so I will always have a memory of the cruise whenever I use it.
I made a couple of cards too, I experimented with using different heights for the quilled elements here. With more time I would have filled up the entire heart! Lol!
Again, Happy New Year and may you learn some new crafty techniques in 2012.
The port hole in our cabin was a constant source of delight. It showed us when we were coming into ports, what the weather was like, the stars by night, oh it was lovely being able to just hop out of bed at night and watch the ocean rolling by. It was also a convenient platform for taking pictures of my quilled pieces!!
Here's a double frilled flower I learned how to make. I must make a tutorial for you on PaperCraftCentral.com one day soon. They are easy to make with scraps of scrapbooking paper or thin cardstock.
These quilled roses and leaves were easy to make as well. I placed them on the very end of a bookmark so I will always have a memory of the cruise whenever I use it.
I made a couple of cards too, I experimented with using different heights for the quilled elements here. With more time I would have filled up the entire heart! Lol!
Again, Happy New Year and may you learn some new crafty techniques in 2012.
Saturday, December 24, 2011
Merry Christmas One And All!
A little handmade Christmas star to wish you all a Merry Christmas. I just wanted to share a little quote with you as well:
Anonymous
Have a wonderful Christmas.
Love came down on Christmas Day so many years ago and brought the
greatest happiness the world would ever know... Peace came down on
Christmas Day to fill the hearts of men with all the sweet tranquility
each Christmas brings again... Joy came down on Christmas Day as angels came to earth heralding the miracle of our Messiah's birth.
Have a wonderful Christmas.
Thursday, December 15, 2011
A Vintage Music Christmas Card
Tonight I wanted to play with making aged sheet music to use on a Christmas card for a friend. I was inspired by Ute who sells 100 year old music sheets for crafting in the UK. Now I don't have any of Ute's music, but I did have a Stampin' Up! stamping wheel and some cardstock and ink, and a distressing tool. So I got to work with some Very Vanilla cardstock and some Chocolate Chip ink and made the basis for my background. I edged the piece with Soft Suede ink and backed it with some Perfect Plum cardstock. Then I had fun colouring the little birdie with some Stampin' Write markers before adding him to the card along with a bit of Chantilly Lace and Linen Cord.
The sentiment comes from the same stamp set, Beautiful Season (item no 124944 in wood mount for $41.95 plus postage or item no 122682 in clear mount for $33.95plus postage if you want to order it).
I hope you enjoy my attempt at making Vintage Music. I sure had fun with it :)
The sentiment comes from the same stamp set, Beautiful Season (item no 124944 in wood mount for $41.95 plus postage or item no 122682 in clear mount for $33.95plus postage if you want to order it).
I hope you enjoy my attempt at making Vintage Music. I sure had fun with it :)
Tuesday, December 06, 2011
December Frenzy at Stampin' Up! Australia
There are some fantastic specials offered at Stampin' Up! this month.
They are offerieng many great products at 50% off! Have a look and let
me know if I can 'enable' you this month at all ... you know I love to
help!
http://www.stampinup.net/esuite/home/susansalutations/promotions
Saturday, December 03, 2011
Not a Christmas Card!
I know everyone who celebrates it is probably still making Christmas cards and decorations, wrapping presents and writing special Christmas notes. I should be doing that too, but today some friends of mine got married and I needed a handmade greeting for them. I came up with this little number:
Lately I am really loving the look of Whisper White and Very Vanilla cardstock together. Ever since I discovered it, I have loved that Whisper white organza ribbon too. There is just something so simple and elegant about putting these two colours together. I liked how the card turned out and hope it pleased my friends too of course.
You can't see it but I also cut out a scalloped envelope in Very Vanilla and used it as a pocket for my wedding gift. I sent them some cash to help out with starting their household. The envelope worked well for that and added security as I 'sealed' the envelope with some re-positionable Glue Dots.
Congratulations to my young friends who married today. May your marriage be richly blessed!
PS: If you would like the supply list and instructions for making this card, you can see both at www.PaperCraftCentral.com.
Lately I am really loving the look of Whisper White and Very Vanilla cardstock together. Ever since I discovered it, I have loved that Whisper white organza ribbon too. There is just something so simple and elegant about putting these two colours together. I liked how the card turned out and hope it pleased my friends too of course.
You can't see it but I also cut out a scalloped envelope in Very Vanilla and used it as a pocket for my wedding gift. I sent them some cash to help out with starting their household. The envelope worked well for that and added security as I 'sealed' the envelope with some re-positionable Glue Dots.
Congratulations to my young friends who married today. May your marriage be richly blessed!
PS: If you would like the supply list and instructions for making this card, you can see both at www.PaperCraftCentral.com.
Sunday, November 20, 2011
It's Thanksgiving this week
Do you have something to be thankful for? I know I do and it would take so long to make a list of gratitude here. I'm even grateful for the length of my list!
This week my thoughts turned to far away family and friends celebrating Thanksgiving. In Australia I have only celebrated it a handful of times, but I still think of the day and remember what it was like to have family and friends around for a special sharing time a time of good company and good food and laughter.
Pumpkins seem to symbolise the day for me more than turkeys do, for some reason. I therefore decided to play with the idea of making a paper punch art pumpkin and see if I could turn it into a card. Here's how it turned out:
You can see a supply list and get instructions for making your own pumpkin card here.
PS: Remember, Aussie readers can order all non-retired Stampin' Up! supplies used from me too :) Just contact me at SusanSalutations.
Happy Thanksgiving!
This week my thoughts turned to far away family and friends celebrating Thanksgiving. In Australia I have only celebrated it a handful of times, but I still think of the day and remember what it was like to have family and friends around for a special sharing time a time of good company and good food and laughter.
Pumpkins seem to symbolise the day for me more than turkeys do, for some reason. I therefore decided to play with the idea of making a paper punch art pumpkin and see if I could turn it into a card. Here's how it turned out:
You can see a supply list and get instructions for making your own pumpkin card here.
PS: Remember, Aussie readers can order all non-retired Stampin' Up! supplies used from me too :) Just contact me at SusanSalutations.
Happy Thanksgiving!
Sunday, November 06, 2011
Masculine and Feminine
Then we made some pretty, feminine gift boxes with the Fancy Favor Bog Shot die and the new lace ribbon punch.We stamped on the box before it was assembled and glued the punched ribbon border on as well.
If you would like to order any of the materials used in these projects you can find them on the product pages at SusanSalutations and contact me from there.
Happy Stampin'
Thursday, November 03, 2011
October Card Class
This week I am making swap cards for the Stampin' Up! Regionals that happen on Saturday. Will share a picture of those once they are complete. I'm using a colour combination of Old Olive, Night of Navy, Very Vanilla, Daffodil Delight and some very pretty Christmas fabric.
Happy Crafting!
Sunday, October 09, 2011
Christmas Stockings
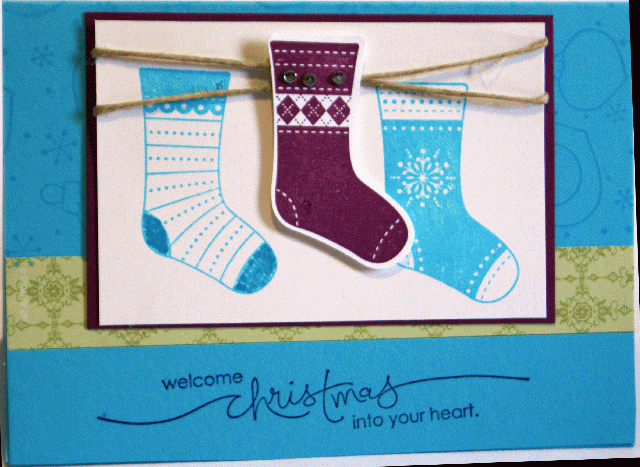
Stockings at Christmas! I remember having a Christmas stocking from the time i was a little girls. My Aunt made me a specialone that I still have. It comes out to grace my home in December each year. So when I saw the new Stitched Stocking stamp set and punch from Stampin' Up! I wanted to play!
I made this card using non-traditional colours. Whisper White, Pear Pizazz and Tempting Turquoise go together well so I chose them. That's Hemp Cord (also from Stampin' Up!) wrapped around the cnetre piece.
If you don't want to make Christmas cards just yet I have seen some adorable hobby horses made from upside down stockings (give them ears, add an eye and some thread mane, then a cardstock 'stick' and voila!)
Then there are the baby booties I saw made from the striped stocking with a few stripes removed so the top fits on the sock part like a bootie.....
I'll see if I get a chance to make you a sample or two soon.
In the meantime, if you live in Australia and would like to order this set before it is released in the summer mini catalogue, you can! Contact me to place your order :)
Stitched Stocking Stamp Set (7 stamps) wood mount 125798 $53.95
clear mount 123784 $42.95
Stocking Tag Punch 124095 $33.95
I made this card using non-traditional colours. Whisper White, Pear Pizazz and Tempting Turquoise go together well so I chose them. That's Hemp Cord (also from Stampin' Up!) wrapped around the cnetre piece.
If you don't want to make Christmas cards just yet I have seen some adorable hobby horses made from upside down stockings (give them ears, add an eye and some thread mane, then a cardstock 'stick' and voila!)
Then there are the baby booties I saw made from the striped stocking with a few stripes removed so the top fits on the sock part like a bootie.....
I'll see if I get a chance to make you a sample or two soon.
In the meantime, if you live in Australia and would like to order this set before it is released in the summer mini catalogue, you can! Contact me to place your order :)
Stitched Stocking Stamp Set (7 stamps) wood mount 125798 $53.95
clear mount 123784 $42.95
Stocking Tag Punch 124095 $33.95
Tuesday, October 04, 2011
Christmas Stamp A Stack
Did you know it was World Cardmaking Day on Saturday? I just happened to have a Christmas Card Stamp A Stack organised and we girls had some fun in the afternoon, making Christmas cards! This is one of the five we made with the Contempo Christmas and Baroque Motifs stamp sets. I made it all in shades of purple: Wisteria Wonder, Perfect Plum and Elegant Eggplant. The branch has been made from Garden Green. We made the pretty trim with the new Lace Border punch, and decorated the middle bauble with a sweet little bow made from Whisper White Taffeta ribbon.
What a lovely way to enjoy World Cardmaking Day!
Subscribe to:
Posts (Atom)