

Monday, December 24, 2012
Merry Christmas!
Just a quick message to you all. I hope you and your loved ones have a Merry Christmas and a blessed New Year. Remember, Jesus is the Reason for the Season :)
 See you some more in 2013
Friday, December 21, 2012
Metal Embossing
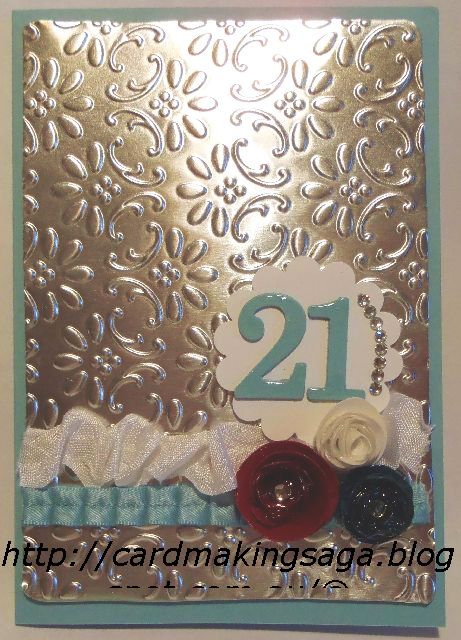
It's nearly Christmas! But this isn't necessarily a Christmas project, though you could use this idea for any occasion. I decided to make a special gift for one of my sweet nieces this week. She is turning 21 this month and I wanted to give her something personal that would last a bit longer than a paper card, so I turned to metal and alcohol inks :)
I used my Big Shot to emboss my metal card background and then added ribbon and some handmade flowers. Then I cut out some numbers with my Big Shot and stacked them on top of each other, then used Crystal Effects to seal and gloss them up. I added a few rhinestones and voila.
 Once you have added some 3d flowers to a card, it is difficult to fit it into an ordinary envelope, so I decided this card needed its own special box.
I made it in a similar way to the card. The box itself is made from cardstock, but the lid has a metal finish. This time though, I used my Copics to tint the flowers and leaves. Then I added some ruffled ribbon and pearl jewels to finish it.

I thought the finished box and card looked pretty special, and fortunately my niece agreed! I think I shall be making more of these gift combinations. I think they have a bit of that 'wow' factor.
What do you think?


I used my Big Shot to emboss my metal card background and then added ribbon and some handmade flowers. Then I cut out some numbers with my Big Shot and stacked them on top of each other, then used Crystal Effects to seal and gloss them up. I added a few rhinestones and voila.
I made it in a similar way to the card. The box itself is made from cardstock, but the lid has a metal finish. This time though, I used my Copics to tint the flowers and leaves. Then I added some ruffled ribbon and pearl jewels to finish it.

I thought the finished box and card looked pretty special, and fortunately my niece agreed! I think I shall be making more of these gift combinations. I think they have a bit of that 'wow' factor.
What do you think?


Friday, December 07, 2012
Catch me if you can!
Gingerbread men are just so cute. I love the new Scentsational Season stamp set and coordinating Holiday Collection Framelits dies. Then I found out how to make my gingerbread men look like they had been sugared, and I just had to make a gingerbread man card! (You heat emboss More Mustard cardstock with Iridescent Ice, in case you were wondering).
I saw a couple of other cards that used the penny roller technique as well to add movement to their cards and decided I could have a rolling gingerbread man on mine. Well, they like to run away in fairy tales, right?
Here's how it all turned out. I loved it so much I had a class about how to make these at my home this week. You can find the instructions on PaperCraftCentral.

Oh and we also made some cute little gift boxes:

It sure looked like Christmas around here this week. Now if I could only find time to send out my Christmas cards! Lol!
Have a great day.
Sunday, December 02, 2012
Slider Cards
I just got a question from Roxanne about how to make cute slider cards. I had a similar card in my stash I could tell her about. The instructions are on PaperCraftCentral if you would like to know how i made this kind of card, too:

I really should make some Christmas slider cards, shouldn't I. Imagine a ginger bread man or a Christmas tree sliding out to greet you on the tag. Hey, now THERE'S an idea! Be back later!

I really should make some Christmas slider cards, shouldn't I. Imagine a ginger bread man or a Christmas tree sliding out to greet you on the tag. Hey, now THERE'S an idea! Be back later!
Saturday, December 01, 2012
A New Tool for Me!

Of course, a new paper trimmer means crafting a bit more, don't you think? I have been busily doing so. Here's a little handmade gift albu I made with some of my crafting friends inside:


Think I'll do that about now :)
Tuesday, November 06, 2012
2012 Cards for the Troops Drive
The time to donate to the 2012 Christmas Cards for the Troops drive has come to an end. I was so touched to receive the couple of hundred cards you all sent and am busy packaging them up to get them to our Troops in time. There are some beautiful cards among the collection. I tried to take photos of all the different designs and have cobbled together a slide show for you that I will add to as I edit more photos of the collection.
Seeing them all together in a photo gallery is such concentrated inspiration!
The Troops who get these handmade greetings will be able to send their loved ones something very special this Christmas, thanks to a dedicated group of papercrafters with generous hearts. ♥♥♥
Look out for the beginning of the drive next year, around June or July. As long as the Forces allow is to send them, I want to make sure those who want a chance to contribute to this cause can do so :)
Thank you again!
PS: Here is a simple design I made for our Troops. I am hoping it will inspire some new people to make cards for 2013. Your cards don't have to be complicated to be appreciated by the deployed who have limited chances to buy Christmas cards when posted to foreign locations.

 Stampin' Up! Supplies used:
Lovely as a Tree and Christmas Classics stamp sets
Framelet template
Large oval punch and Fancy Tag punch
Whisper White and Cherry Cobbler cardstock
Crumb Cake and Garden Green ink
Clear embossing powder
Retired ribbon
Seeing them all together in a photo gallery is such concentrated inspiration!
The Troops who get these handmade greetings will be able to send their loved ones something very special this Christmas, thanks to a dedicated group of papercrafters with generous hearts. ♥♥♥
Look out for the beginning of the drive next year, around June or July. As long as the Forces allow is to send them, I want to make sure those who want a chance to contribute to this cause can do so :)
Thank you again!
PS: Here is a simple design I made for our Troops. I am hoping it will inspire some new people to make cards for 2013. Your cards don't have to be complicated to be appreciated by the deployed who have limited chances to buy Christmas cards when posted to foreign locations.


Lovely as a Tree and Christmas Classics stamp sets
Framelet template
Large oval punch and Fancy Tag punch
Whisper White and Cherry Cobbler cardstock
Crumb Cake and Garden Green ink
Clear embossing powder
Retired ribbon
Sunday, October 28, 2012
Tool Time 70th Birthday
I think it is safe to post this card here. The person it is for lives a looooong way away and isn't known to blog hop, so it is better than posting on Facebook, right? I would hate to spoil the surprise! The story is, a friend wanted a special card for her Dad who is turning 70 next week, and when she told me he used to be a Navy man and he loved working with tools, the Tool Time stamp set and this nautical designer series paper (neither available any longer, sadly) both came to mind. His favourite colours are navy and red, so I was just about ready to make the card armed with this information. It still takes thought to plan it out though, doesn't it?!
Anyway, I came up with an easel card for her and included plenty of white cardstock inside for people to sign as it was going to be a group card.
I made the numbers with my Big Shot and some retired dies. I layered four Cherry Cobbler cardstock cutouts together and glossed them up with Crystal Effects that had to be left to dry overnight. The ribbon and card base are Night of Navy, and the Baker's Twine is Island Indigo. I used some Washi tape to make the pennants and some brushed silver brads to enhance and anchor bits and pieces. The tools were stamped in Basic Black then stamped again in Versamark and embossed with silver embossing powder for the card, but I stamped them in Cherry Cobbler for the envelope and used the masking technique to layer them. Then I used some grey Copics to add shadows.


 Till next time :)
Anyway, I came up with an easel card for her and included plenty of white cardstock inside for people to sign as it was going to be a group card.
I made the numbers with my Big Shot and some retired dies. I layered four Cherry Cobbler cardstock cutouts together and glossed them up with Crystal Effects that had to be left to dry overnight. The ribbon and card base are Night of Navy, and the Baker's Twine is Island Indigo. I used some Washi tape to make the pennants and some brushed silver brads to enhance and anchor bits and pieces. The tools were stamped in Basic Black then stamped again in Versamark and embossed with silver embossing powder for the card, but I stamped them in Cherry Cobbler for the envelope and used the masking technique to layer them. Then I used some grey Copics to add shadows.


Tuesday, October 23, 2012
October 2012 Craft Class
Have you seen the new Ornament Keepsake Bundle in the Summer Mini catalogue put out by Stampin' Up!? There is a beautiful Christmas decoration displayed on the cover of the mini. I wanted to make one the moment I saw it but it took till this week for me to get a chance to learn how. On Saturday I experimented all day and came up with two samples to show to my Craft Class today. The first one is made in Old Olive and Cherry Cobbler, and the second is Cherry Cobbler and Perfect Plum. I so want to make a few more as gifts using different colours and centres, and maybe a bit more bling! Even without much bling, these ornaments are just lovely.

 We had a lot of fun in today's Class making these! Thanks for the laughs, ladies :)
Australian Readers:
If you want an Ornament Keepsake Bundle I can take your order if you live in Australia. I will also include the instructions for making these ornaments if you purchase the bundle.
Supply List:


Australian Readers:
If you want an Ornament Keepsake Bundle I can take your order if you live in Australia. I will also include the instructions for making these ornaments if you purchase the bundle.
Supply List:
Very Vanilla A4 cardstock
Cherry Cobbler
/Perfect Plum and Old Olive ink pads
Ornament
Keepsake Stamp Set
Perfect
Punches Stamp Set
1 ¾ Scallop
Circle punch
1 3/8 Circle
Punch
Holiday
Ornaments Framelets
Big Shot
Silicone Craft Sheet
Cherry Cobbler 3-1/2" Scalloped Tulle Ribbon
Linen Twine/Baker's Twine
Large Pearl
Faceted
Clear Button
Designer series paper
Crop-a-dile
or hole punch
Ribbon/tinsel for hanger
Shimmer
paint spray
Tuesday, October 09, 2012
Cards for the Troops
It's October! Time to make last efforts to add to the ever growing stock of Christmas (and other) cards I am collecting for our Aussie Troops. If you would like to send cards for them, please do. They need to be to me before October 31st, so there is still a little time left, but the days are counting down fast. you can see how to send them to me on this page at PaperCraftCentral.
Before this year's lovely Stampin' Up! catalogue came out, I succumbed to buying a three wise men image from another supplier. Now there is a lovely stamp similar to it available in this year's Stampin' Up! catalogue (item number (on page 20 of the new Idea Book and Catalogue) so I wish I had waited. I had a couple of images from this other stamp all stamped out so just went ahead and made them up in greens and blues (all other supplies are from Stampin' Up!):

 I sure hope they help make someone's Christmas a little brighter!
Before this year's lovely Stampin' Up! catalogue came out, I succumbed to buying a three wise men image from another supplier. Now there is a lovely stamp similar to it available in this year's Stampin' Up! catalogue (item number (on page 20 of the new Idea Book and Catalogue) so I wish I had waited. I had a couple of images from this other stamp all stamped out so just went ahead and made them up in greens and blues (all other supplies are from Stampin' Up!):


Sunday, October 07, 2012
Happy World Cardmaking Day
....for yesterday :)


Here's the card I made yesterday. I took part in a challenge to make hand punched flowers, use designer series paper as part of the background, add a stamped sentiment, use bling, and use misting.


Thank you for the challenge, Lucy!
Supplies:
Cardstock: Pumpkin pie, Cherry Cobbler, Poppy Parade, So Saffron
Designer series paper was retired
Punches: Scallop circle, Itty bitties, Lacy border, circles, snowflake, corner
Bling: glitter brads, silver flower brad, pearl, retired glittery ribbon
Spray mists
Stamp Set - Rue des Fleurs
Thursday, October 04, 2012
Boy Birthday with a Difference!
I have a young male friend who is turning 20 tomorrow, and his favourite colour is PINK! It was a challenge for me to use pink and yet make a card that could be considered masculine. Have you ever used pink so thoroughly in a masculine card? I hope I managed to make it in a way he will like it. We'll see in less than 24 hours....
Here's the inside of the card. I plan to write a note above the sentiment this time.
 Here's the front of the card. It was actually a fun card to make.

I'll let you know how things go!
Supplies (all from Stampin' Up!):
Stamp sets: Need for Speed, Bring on the Cake
Cardstock: Whisper WHite. Certainly Celery, Pink Pirouette
Ink: Basic Black, Melon Mambo, Bashful Blue, Certainly Celery, Crumb Cake
Accessories: Antique silver brads, Crystal Effects, denim ribbon, hand cut star, retired designer series paper, Stampin' write markers in the above ink colours
Here's the inside of the card. I plan to write a note above the sentiment this time.


I'll let you know how things go!
Supplies (all from Stampin' Up!):
Stamp sets: Need for Speed, Bring on the Cake
Cardstock: Whisper WHite. Certainly Celery, Pink Pirouette
Ink: Basic Black, Melon Mambo, Bashful Blue, Certainly Celery, Crumb Cake
Accessories: Antique silver brads, Crystal Effects, denim ribbon, hand cut star, retired designer series paper, Stampin' write markers in the above ink colours
Monday, September 24, 2012
Praying for you card
This week needed a Sympathy Card. I had been experimenting some more with my Flower Garden embossing folder and brayer and had produced some images in Crumb Cake ink that weren't quite what I wanted for another purpose, but they were pretty and I saved them. Now these particular images seemed perfect for my Sympathy card.
I sponged around the image in Crumb Cake and that seemed to finish it off nicely. No need for shimmer or glitter on this occasion.
I layered it on two different retired designer series papers, then added the embossed image and tied some natural knotted cotton tape over the lot. The card didn't seem finished so I punched out two Scallop Trim borders in Crumb Cake and added narrow strips of Soft Suede cardstock over the borders.
I used the offcuts from the embossed image to stamp the sentiment onto then layered the message over some Certainly Celery cardstock. Three generic yellow brads seemed to fit as well.
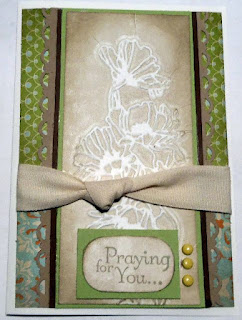
I even finished the inside of this card, this time (thank you, Carla, for the inspiration to do so. I cannot emulate your wonderful style and come up with a CAS style instead no matter what I do:)) I used one of the trees from the Thoughts and Prayers stamp set to support the layered sentiment. Our handwritten personal note went to the right of the sentiment. And yes, I added a tree to the envelope as well :)

My goodness I am coming to the end of my cardmaking 'run' so will just have to make time to return to my craft desk soon :) I need to make more Cards for the Troops anyway, so maybe there will be a few Christmas cards posted here soon. I do have some new stamp sets to play with, coincidentally...he he he.
Sunday, September 23, 2012
Thailand Tigers
Now for something completely different! Well, different in that I usually post cards, right? This time I actually made a double layout of Col and I in Thailand, getting to know some tigers. Yikes! I was sure nervous abotu getting to know tigers! But Col was determined. It was one of his lifelong wishes, to get close to a real live tiger. The day we went to this particular place, he got close to many tigers. We lost count. And he had a ball. I was still very wary as those things are HUGE and the paws on the bigger ones alone were bigger than dinner plates. They were quite used to the Buddhist monks who handled them though and tolerated us without protest.
So here it is, the Thailand Tigers double layout (most of the supplies were non-Stampin' Up! items and i cannot remember which companies etc made the papers and so on, but it was a fun layout to make).

So here it is, the Thailand Tigers double layout (most of the supplies were non-Stampin' Up! items and i cannot remember which companies etc made the papers and so on, but it was a fun layout to make).

Are you Dragon today?
I'm draggin' a bit - lol! I always feel slow in the morning :) I guess that passes abotu 10am? It does for me, anyway.
The other night I made another punch art card for another grandson who turns 4 this month. I found this idea while surfing Stampin' Up! blogs too but this time i didn't record the crafter's name. So sorry about that! I enjoyed making this smokey little fellow though.I had to make this one similar to my Punch Buggy as the two grandsons are brothers and we cannot have something TOO different, now can we.

Have a beautiful day. I'm off to church!
Supplies:
All Stampin' Up! supplies were used.
Cardstock: Pumpkin Pie, Old Olive, Not Quite Navy, Shara Sand, Whisper White. Poppy Parade, Confetti
Ink: Not Quite Navy
Punches: Various oval, circle, scallop border and heart punches
Sentiment: Hand written with a black journaling pen
Saturday, September 22, 2012
Punch Buggy
When my daughter was small, we used to have a game when we drove along. If we saw a Volkswagon Beetle we would yell out 'Punch Buggy!" and punch each other (lightly!) in the arm. This little punch art bug just led me to think of the game. It really isn't a punch buggy. Lol!
I made this one for one of my grandson's 1st birthday. The idea came from a Stampin' Up! demonstrator from Kay Sha of Creations on Paper (thank you for the cute image!) and was very easy to put together once i saw the picture. It came alive with a bit of sponging, don't you think?
Anyway, happy birthday to my little grandson.
 Supplies:
All Stampin; Up! supplies were used -
Cardstock: Old Olive, Basic Black, Whisper White, So Saffron, Poppy Parade
White gel pen, black Stampin' Write marker
Various oval and circle punches, a small heart punch plus a scallop border punch
Big Shot Top Note die
Hand written sentiment
I made this one for one of my grandson's 1st birthday. The idea came from a Stampin' Up! demonstrator from Kay Sha of Creations on Paper (thank you for the cute image!) and was very easy to put together once i saw the picture. It came alive with a bit of sponging, don't you think?
Anyway, happy birthday to my little grandson.

All Stampin; Up! supplies were used -
Cardstock: Old Olive, Basic Black, Whisper White, So Saffron, Poppy Parade
White gel pen, black Stampin' Write marker
Various oval and circle punches, a small heart punch plus a scallop border punch
Big Shot Top Note die
Hand written sentiment
Embossed and Shimmered
I had a crafty evening this evening. I made five new cards, all for special occasions in the family. I know the person I made this one for won't see it till she gets it, so I shall share it with you:

 It was a simple card to make. I embossed the background with an inky embossing folder, then shimmer sprayed it. That's the only trick I used, really! And the camera doesn't pick up the shimmer at all, but believe me, it is there.
Must get some sleep. Maybe will post another card tomorrow {yawn}
Supplies:
Stampin' Up! (SU!) cardstock - Whisper White, Certainly Celery
Certainly Celery ink & taffeta ribbon
Retired designer series paper & shiny ribbon
SU! pearls
SU! Flower Garden embossing folder
SU! shimmer paint mixed with rubbing alcohol
Friday, September 14, 2012
Double Layer Stamping
You know the stamp sets you think you don't like, then you get a chance to play with them and you like them a lot? I was like that with Betsy's Blossoms. It was one set I could get in advance when the new Stampin' Up! Annual Catalogue came out. I didn't know if I liked it till I stamped with it, and guess what? I like it. Lol!
I built a class around the double stamping technique with it in fact, and here is a sample of the cards we made:
 That little birdie is so cute, the flowers so lovely to use, the new In Colours so refreshing....
Now if I could only get the lighting for photos right!
I built a class around the double stamping technique with it in fact, and here is a sample of the cards we made:

Now if I could only get the lighting for photos right!
Monday, September 03, 2012
Metallic Masculine Cards
Got any spare roof flashing? Got a Big Shot and a rugged embossing folder? Then you can make Metallic Masculine Cards!
The is one of the two cards we made at the last Stampin' Up! class I ran in August. The technique can be used for many other types of cards and will take the most delicate of embossing designs as well. All you do is cut a piece of thin metal (such as roof flashing) and place it in your embossing folder as though it were just cardstock, then run your 'sandwich' through the Big Shot.
Be careful of any sharp edges or corners on your embossed metal sheet. I like to blunt the corners of my metal sheets a little with my craft scissors. The metal will tend to curve a bit as well. I always place the metal on the card with the arched back up, then flatten it down so the edges and corners bed down nicely on the card.
Just use ordinary two-way glue pen to adhere it to your cardstock.
 Supplies (all from Stampin' Up! except the roof flashing. That was form Bunnings.):
Cardstock and Ink colours: Gumball Green , Midnight Muse, Whisper White
Stamps: Teeny Tiny Sentiments, retired Stampin' Around Wheel whose name escapes me
Embossing folder: Houndstooth
Notions: Neutrals buttons, Linen thread, Glue dots, Two Way Glue Pen
The is one of the two cards we made at the last Stampin' Up! class I ran in August. The technique can be used for many other types of cards and will take the most delicate of embossing designs as well. All you do is cut a piece of thin metal (such as roof flashing) and place it in your embossing folder as though it were just cardstock, then run your 'sandwich' through the Big Shot.
Be careful of any sharp edges or corners on your embossed metal sheet. I like to blunt the corners of my metal sheets a little with my craft scissors. The metal will tend to curve a bit as well. I always place the metal on the card with the arched back up, then flatten it down so the edges and corners bed down nicely on the card.
Just use ordinary two-way glue pen to adhere it to your cardstock.

Cardstock and Ink colours: Gumball Green , Midnight Muse, Whisper White
Stamps: Teeny Tiny Sentiments, retired Stampin' Around Wheel whose name escapes me
Embossing folder: Houndstooth
Notions: Neutrals buttons, Linen thread, Glue dots, Two Way Glue Pen
Monday, August 27, 2012
Just gotta brag a little....
My daughter has been acting for a little while now and this week she is in a TV/webmercial about Skybury Coffee Plantation in Far North Queensland. I am really glad she has found this type of work and hope for more good things in the future for her! Here's the video (well done, Liz :))
Saturday, August 18, 2012
Extreme Elements
I was having a bit of fun today playing with backgrounds. It is a friend's birthday tonight and I as he is interested in racing cars (Speedway, whatever that is. Lol!) I decided to make a card with a car on it. I like using the car stamps with the Extreme Elements stamp set. It looks to me like the car is in motion and is splashing through puddles :)
It's funny about the process of choosing colours. I started with Poppy Parade as my friend likes red. The Colour Coach suggested Baja Breeze, So Saffron and Tangerine Tango would work together so I got them out. The red glitter paper also appealed to me so I added it to the pile. And eventually I also wanted some designer series paper so found some from the Tickets and Tags pack. I knew there was not going to be any ribbon on the card but I did go for some brushed silver brads. I didn't wind up using any Baja Breeze except for the stamped stars and the glitter paper got ignored too. I masked off the car so I could add details to the background, after I stamped it in Basic Black ink.
That Colour Coach does a good job of coordinating colours though and I love that I can just grab any of the suggested ones and know they will 'fit'.

Thursday, August 16, 2012
Thai Papercraft
I just returned from a wonderful (though short!) trip to Thailand where I attended an SBI Seminar that was very worthwhile. While i was there i kept an eye out for Thai paper crafts. I saw some amazing public works as it was the Queen's birthday weekend and there were many lovely displays commemorating her special day. One of the displays was made all of paper and graced the atrium of a beautiful shopping centre there. I could see that the flowers were quilled, but on a grand scale! Other techniques were also used but it was the quilling that captured my imagination. What size was their quilling tool, I wonder? It would not be the same as the average crafter's choice! Lol!
The paper used was ivory, thick and luscious. The display was lit by ever changing lights so the paper picked up different hues. It was difficult to get the whole display in my viewfinder but I tried to capture it for you anyway.
Have you ever made papercraft items for public displays? If so, please do tell me about it in your comments :)


Wednesday, August 01, 2012
Stampin' Up! Retirement List
This year's Retirement List from Stampin' Up! is now available.Once the items on the list are sold out, they are gone forever! If you are in Australia, let me know if you need anything as soon as possible and we'll do something about it :)
Monday, July 23, 2012
Coffee and Cream Quilt
Ta dahhh! This is a picture of my first quilt, being held up by my kind, long-suffering husband and my ever-supportive though attention seeking dog. I finished this lap quilt in April but it has taken me awhile to get round to taking its portrait. I think it is called a post and rail quilt? I could be wrong there. Anyway, it is my first quilt and I love it. It has a wool centre and is just the right weight to have on my lap these cool winter in Queensland evenings :)
 I have kind of fallen in love with fabric all over again now that I have started to learn about quilting. I am even putting fabric on my handmade cards, like the ones we made in the June class I ran here at home:
 This paper and fabric and embellishment range is the Twitterpated range from Stampin' Up! I can see it will only be a matter of time before I quilt some Stampin Up! fabric into something.
Stay tuned!


Stay tuned!
Saturday, July 07, 2012
Special Birthday
Tonight we enjoyed some time with friends, one of whom was celebrating a special birthday. Now as this had to be a masculine card, I decided it was time to try out the sponged background techniques I have been reading abotu on Michelle Zindorf's blog. I didn't make a card exactly liek one of hers, but I sure studied her techniques! Lol!
I also chose out my The Open Sea stamp set to use as I like it so much. The ship kind of reminds me of a pirate ship for some reason, but that's another story :)
For the background I first sponged the sun colour in Daffodil delight. Then I masked off the sun area and continued to sponge around it to make the sky, in Bashful Blue, Baja Breeze and Night of Navy..
Then I masked off the sky, removed the sun mask and sponged a line of Night of Navy to form the horizon. The sea was sponged int he same colours as the sky but the waves were made with my white gel pen.
Then I stamped the ship in Versamark and Basic black, and embossed it with black embossing powder. The little birds were hand drawn with my black journaling pen. I added some brushed solver brads, mounted it on a split Top Note Night of Navy cardstock shape, and then made the little tag a punch, Teeny Tiny Sentiments, Versamark ink, black embossing powder and a journaling pen.
I hope you like it. I was happy with the result and want to play with some more sponged background techniques now.
 PS: I made a tutorial about how to create a similar seascape background using Brayers over on PaperCraftCentral . Let me know if you make some cards using this technique!
I also chose out my The Open Sea stamp set to use as I like it so much. The ship kind of reminds me of a pirate ship for some reason, but that's another story :)
For the background I first sponged the sun colour in Daffodil delight. Then I masked off the sun area and continued to sponge around it to make the sky, in Bashful Blue, Baja Breeze and Night of Navy..
Then I masked off the sky, removed the sun mask and sponged a line of Night of Navy to form the horizon. The sea was sponged int he same colours as the sky but the waves were made with my white gel pen.
Then I stamped the ship in Versamark and Basic black, and embossed it with black embossing powder. The little birds were hand drawn with my black journaling pen. I added some brushed solver brads, mounted it on a split Top Note Night of Navy cardstock shape, and then made the little tag a punch, Teeny Tiny Sentiments, Versamark ink, black embossing powder and a journaling pen.
I hope you like it. I was happy with the result and want to play with some more sponged background techniques now.

Wednesday, June 06, 2012
May Card Class
My we had fun in May with a birthday theme for our card class. We made a paper cake from wedge shaped boxes. You could put treats in the boxes, like candies, small gifts, anything really. A couple of the class members commented that you could make a whole lot of wedges fro a wedding and send guests home with a slice of wedding cake inside the wedge. What a great idea! We also made little chocolate favours to put on the birthday table. We used Dove chocolates for the favours but let your imagination go wild and add any type you wish to the favour boxes (made form punching out two double petal shapes and adhering three sides together).
 And what's a birthday party without birthday cards? This one is made using the Apothecary Art stamp set and matching dies, accordion pleated cardstock, doileys and Stampin' Write markers. We made them is several colours and all of them looked lovely:


It was sure a fun day. Thanks for enjoying it with me, ladies!


It was sure a fun day. Thanks for enjoying it with me, ladies!
Subscribe to:
Posts (Atom)