SusanSalutations

Tuesday, March 22, 2016

Bunny Invasion

A blog I like to go see now and then is Qbee's Quest. She is such a clever woman who makes wonderful papercraft projects and tells you how to make them! Her bunny cards were so cute, I made them for all my grandchildren and one special person last night. Some of the stamp sets Qbee used are not in my collection yet so I improvised with the faces and drew my own.  Likewise with the framelits I didn't have. I improvised. Once you have a crafting idea, you can usually make something similar using your existing supplies, right?

I used various colours of pink and blue cardstock and their matching or coordinating Stampin' Write! markers, plus some Wink of Stella for the noses and ears. I used my oval, circle and heart framelits, and I used oval, tiny flower and owl punches to create the rest. I forgot to take a picture of the back of one of these cards. Each has a Whisper White tail.


Happy Easter!


Sunday, March 20, 2016

Make Your Own Rub Ons

I know rub ons aren't that commonly used any more, but I was reminded of their versatility recently when I wanted to add a sentiment that I didn't have a stamp for to a piece that I could not put through the printer. That's when knowing how to make your own rub ons or transfers is so handy! I made a tutorial for you about this very thing at PaperCraftCentral.

Here's a cute little bookmark I made with the technique. I added the sentiment on the tag by using a home made rub on. I hand made the rose too but that is a story for another day. The stamped flowers came form the Botanicals For You stamp set. I used Whisper White, Old Olive, Tangerine Tango and Pool Party cardstock for this project, and the Scalloped Tag Topper punch.


Just click on the link to the tutorial to find out how to customise your own sentiments and images with your computer, printer, a paddle pop stick and a Window Sheet!

All supplies but the ribbon are available from Stampin' Up! at this time.

Flower Fair Window Card


Making a pretty garden come to life in a window is possible when you have the right stamp set and framelits, and inspiration from Lisa Wilkinson. Lol!

I stamped out flowers and leaves from the Flower Patch stamp set using various inks (Blushing Bride, Melon Mambo, Wisteria Wonder, Elegant Eggplant, Certainly Celery and Wild Wasabi) and cut it out with Flower Fair framelits. I made my card base square with Melon Mambo and Blushing Bride cardstock, and ran some Whisper White through my Big Shot with the Brick Wall embossing folder to make the wall as my first card layer.

Then I cut and matted a window frame with my Paper Trimmer and some Melon Mambo cardstock. I ran a scored line inside my frame so it looked more like a casement.

Finally I added all the flowers and leaves, popping them up with Stampin' Dimensionals. I made the sentiment banner, folding the ends back on themselves, and added my greeting from Teeny Tiny Sentiments before popping it up too.


I wanted to make the inside of the card special too so added some retired Washi Tape, another flower and a sentiment form God's Blessings.


Happy Stampin!

Sunday, March 13, 2016

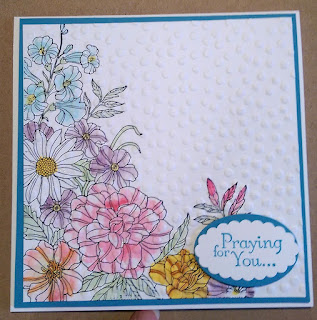
Corner Garden Card

I needed a sympathy card unfortunately, and I wanted to make it as beautiful as I could for the lady left behind. I thought of the Corner Garden stamp set almost immediately as it has such lush floral images.  I imagined it on a white, dry embossed background, and then I saw a card on the web made by a beautiful crafter who I cannot now remember. I did change my card a bit as I only glimpsed the other crafter's card, and it stuck in my head about what I wanted to do. I would have liked to acknowledge whoever made the card that inspired me and will have to be more careful in future to remember.

I started with a square piece of Whisper White, stamping the image onto it in Basic Black. I used various ink colours to bring the flowers to life with my aqua painter. The deeper colours on some flowers are areas where I went over them twice with the same ink colour. This was a labour of love and took me a little while to do, but it was worth it.

I added some discrete shimmer with my Wink of Stella clear pen. After I was happy with the flowers and everything was dry, I ran the stamped piece through my Big Shot with my decorative Dots embossing folder. After that I mounted it on some Pacific Point cardstock and a Whisper White card base.

I stamped and punched out my sentiment and mounted it on the front of the card with Stampin' Dimensionals. Then I made an envelope with my Envelope Punch Board but I forgot to take a photo of that.

Hope you like it.

RIP, my friend.


Saturday, March 05, 2016

The Kissing Technique

Learning different papercrafting techniques can be fun. If you have not heard about extending the use of your stamps by using the Kissing Technique, I have a page for you that tells you how to achieve that effect. It's a good way to make very interesting images for your projects.