SusanSalutations

Thursday, July 16, 2020

Sailing Home with Embossing Paste - a masculine card

There was a new challenge form Sara Douglass, the Stampin' Up! CEO this week. (Yes! She is a crafter too!) She challenged all who love Stampin' Up! to use some stencils and embossing paste this week, and I decided I would answer her call!

So I broke out my (retired) silver embossing paste and a plastic spoon as a tool for spreading it (I couldn't find my palette knives!), found a stencil and some water colour paper, and got to work.

First I washed down my watercolour paper with water from a Water Painter. Then a dropped a couple of drops of Balmy Blue reinker on the paper and washed that around with my Water Painter as a background.

That had to dry before I used my embossing paste so I speeded the drying time along with my heat tool.

Next I laid my stencil down on my silicone craft mat and smooshed some embossing paste over the top. You can get these palette knives to handle the paste. Just remember to have a flattish container with nice, warm, soapy water handy to put your stencils and tools into after you finish smooshing. Embossing paste dries hard very quickly. I also popped my Silicone Craft sheet in ti be cleaned.

While the paste was drying, I prepared some stamped anchors and seaweed, and I heat embossed one anchor in silver. I got my sentiment tag ready too. And I found some retired Designer Series Paper to decorate my Smokey Slate card base inside and out, and got that ready.

I added some retired Baker's Twine to my anchors and then arranged the elements on my card front.
If you emboss with a stencil and paste, you can add a lot of texture and interest to your papercrafting projects
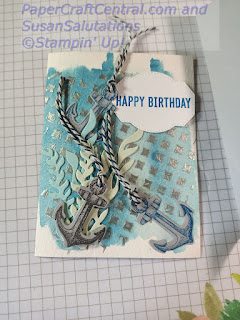
My watercoloured, embossing pasted background with the Sailing Home elements on top


You can get several stencil designs for your papercraft projects from Stampin' Up!

Once I was happy with their placement, I adhered everything down, then added this layer to my decorated, fun fold card base.

The finished masculine card with a watercoloured, embossed background.

Don't forget to decorate the inside of your card!

I decorated the inside of my masculine card with designer series paper and stamping

Have you tried embossing paste yet? You can now get White (141979) and Shimmery White (145645) embossing paste and can change the colour of both with a few drops of reinker, so you can have nearly 50 colours!

Here are some of the other supplies I used in this project:

Sailing Home stamp set

Smooth Sailing dies 

The stencil I used is retired. Current stencils are available.

Palette Knives

Silicone Craft Sheet

Water Painters 

Fluid 100 Watercolour Paper

Heat Tool


Wednesday, July 08, 2020

Blossoms In Bloom!

This week I have been creating with the Blossoms in Bloom stamp set and dies (Bundle item number 154123). What a great bundle this is! The big, beautiful main stamp and die really caught my eye. I have linked all the products I used so you can find them in my SusanSalutations online store. I just know you will want to recreate these cards or explore some ideas of your own!

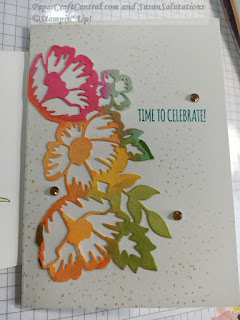
First I started playing with the dies. The main die fills a whole card front! I could cut the die cut in half and make two cards! Woo hoo!

I used one of my Water Painters to water paint different ink colours on the Shimmery White A4 Cardstock die cut and let them dry before I cut the die cut in half.

All it took was some Basic Black cardstock, some Gold Foil sheet and some Gold Stampin' Emboss powder with a few Gilded Gems to create this card. I mounted it on a Pretty Peacock cardstock base.


Many Layered Blossoms dies

Here's a closeup of the water painted blossoms on black:

Many Layered Blossoms Dies

Then I wondered what the second half of the die would look like when glued to a thick Whisper White cardstock base, I was not disappointed!

Many Layered Blossoms dies

It was so fresh looking! I added a few sprinkle images to complete the look. And some more Gilded Gems.

Many Layered Blossoms dies

I embellished my envelopes with blooms from my Floral Essence stamp set.

Then I turned to the stamp set. Wow, I loved the stamps too! Here's a couple of samples of the stamped blossoms. I used the whole stamp for these cards. You could just colour some of the blooms with Stampin' Write Markers if you wanted a partial image of course.

This first card is stamped in Bumblebee ink and the centres are stamped in Cinnamon Cider. The leaves are stamped in Mint Macaron. I mounted the Whisper White cardstock layer on Just Jade cardstock and finished with some Just Jade ribbon and some Rhinestone Basic Jewels.

Blossoms in Bloom stamp set

The next card is the same except for the colours of ink and cardstock. I stamped the petals in Magenta Madness and the centres in Bumblebee. The leaves are again Mint Macaron ink. I added some gems and this time I used some Misty Moonlight cardstock and some Misty Moonlight ribbon.

Blossoms in Bloom stamp set

When I embellished the envelopes, I used the smaller blooms and leaves from the Blossoms in Bloom stamp set.

These cards were quick and easy to make! I love that I could sit down and make a couple of cards in each design. When I make cards, I like to make a couple at a time. I figure I might as well do that since I have all my supplies out for one project anyway.

I hope you enjoyed seeing my projects today.

Oooh wait!, I just realised I have not made any cards with the dies and stamps together on one card! And the size of the blooms stamps and dies really are wonderful for scrapbook pages! What would they look like if I cut a die shape with foil? Or vellum? Or if I heat embossed the stamped blossoms? Or layered them? Or.....

Right, back to the craft room. Lol!

Here's how to order the bundle or the individual stamp set or dies from my store. Leave me a comment if you order and a link to your own project using these dies so I can see!


If you just want the Blossoms in Bloom stamp set, here it is
If you just want the Many Layered Blossoms dies, here they are
If you want the Blossoms in Bloom bundle, this is the page.

Enjoy your stampin' day.